Hypergate
Hypergate is a peer-to-peer encrypted tunnel for exposing local services across NAT/firewalls using Hyperswarm.
It is designed to be mostly zero-conf:
- run a
Service Providerwhere your private services live - run a
Gatewaywhere you want ports exposed - share the same router secret
That is enough for the basic flow.
- Roles
- Why Hypergate
- Network Layout (at a glance)
- Quick Start
- Docker Mode
- Advanced
- Common CLI Options
- Security Notes
- License / Warranty
Roles
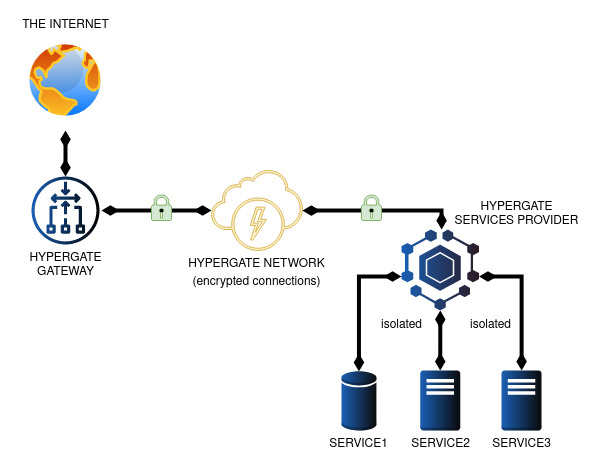
Service Provider: announces local services and accepts tunneled connectionsGateway: opens listening ports and forwards traffic to a providerRouter secret: shared secret that joins the same Hypergate mesh
Multiple providers and gateways can coexist on the same router.
Why Hypergate
- Expose services behind NAT
- Bridge services across machines
- Run a public gateway while keeping backends private
- Work with Docker-discovered services
Network Layout (at a glance)
| Single Provider & Gateway | Multiple Providers & Gateways |
|---|---|
 |
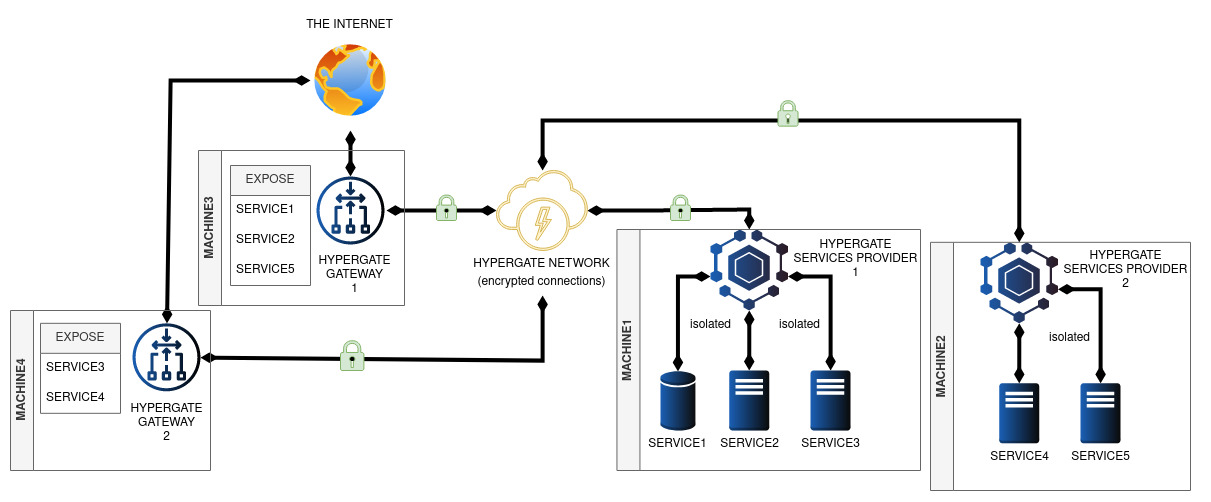 |
Providers are authoritative for route advertisements. Gateways consume those routes and expose the matching ports. If multiple providers advertise the same service/gate, Hypergate can select among them.
Quick Start
Generate a router secret:
hypergate --new
Start a provider:
hypergate --router <router-secret> --provider services/http.json
Start a gateway:
hypergate --router <router-secret> --gateway --listen 0.0.0.0
Example services/http.json:
[
  {
    "gatePort": 8080,
    "serviceHost": "127.0.0.1",
    "servicePort": 8080,
    "protocol": "tcp"
  }
]
Then connect to <gateway-host>:8080.
Docker Mode
Hypergate can discover Docker containers and register services automatically.
| Docker Virtual Network |
|---|
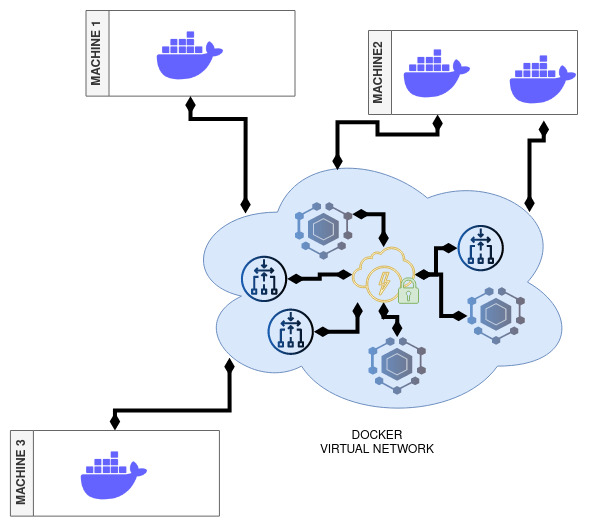 |
This is one of the main zero-conf use cases: containers on different hosts can talk as if they were on the same Docker network, without manual port forwarding.
Docker containers using EXPOSE are discovered automatically. You can also control exposure with labels.
Docker labels:
hypergate.EXCLUDE=\"true|false\"hypergate.EXPOSE=\"port[:public port][/protocol]\"hypergate.UNEXPOSE=\"port[/protocol]\"
Examples:
Provider + Docker discovery:
hypergate --router <router> --docker --provider --network hypergatenet
Gateway + Docker helper:
hypergate --router <router> --docker --gateway --listen 0.0.0.0 --network hypergatenet
Example: Cross-Host Docker Network + Public Gateway
Scenario:
MACHINE1hosts MariaDBMACHINE2hosts phpMyAdminMACHINE3exposes phpMyAdmin publicly
- Create router key
docker run -it --rm hypergate --new
- Start Service Provider on
MACHINE1
docker run -it --rm -u root --name="hypergate-sp-machine1" \
  -v /var/run/docker.sock:/var/run/docker.sock \
  hypergate --router <router-key> --docker --provider --network hypergatenet
- Start MariaDB on
MACHINE1and connect it to the Hypergate Docker network
docker run -d --rm --name test-mysql \
  -e MYSQL_ROOT_HOST=% \
  -e MYSQL_DATABASE=wp \
  -e MYSQL_ROOT_PASSWORD=secretpassword \
  --label hypergate.EXPOSE=3306 \
  mysql

docker network connect hypergatenet test-mysql --alias mysql.hyper
- Start Gateway on
MACHINE2
docker run -it --rm -u root --name="hypergate-gw-machine2" \
  -v /var/run/docker.sock:/var/run/docker.sock \
  hypergate --router <router-key> --docker --gateway --listen 0.0.0.0 --network hypergatenet
- Start Service Provider on
MACHINE2
docker run -it --rm -u root --name="hypergate-sp-machine2" \
  -v /var/run/docker.sock:/var/run/docker.sock \
  hypergate --router <router-key> --docker --provider --network hypergatenet
- Start phpMyAdmin on
MACHINE2and connect it to the Hypergate Docker network
docker run --rm --name test-phpmyadmin -d \
  -e PMA_HOST=mysql.hyper \
  --label hypergate.EXPOSE=80 \
  phpmyadmin

docker network connect hypergatenet test-phpmyadmin --alias phpmyadmin.hyper
- Start public Gateway on
MACHINE3
docker run -it --rm -u root --name="hypergate-gw-machine3" \
  -v /var/run/docker.sock:/var/run/docker.sock \
  -p 8080:80 \
  hypergate --router <router-key> --docker --gateway --listen 0.0.0.0 \
  --network hypergatenet --exposeOnlyServices phpmyadmin.hyper
Test:
- Open
http://<machine3>:8080
Advanced
These are optional. You do not need them for normal usage.
Ingress Policy (Provider -> Gateway)
A provider can attach an ingress policy to routes so the gateway can:
- allow/deny specific client IPs
- apply bandwidth shaping per IP
- tag matching clients with labels (included in connection fingerprint metadata)
Pass it with:
hypergate --router <router> --provider services/http.json --ingressPolicy ingress.policy.example.json
Minimal example:
{
  "defaults": {
    "allow": true,
    "bandwidthLimit": { "mbps": 10, "burstMbps": 50 }
  },
  "ips": {
    "203.0.113.10": {
      "bandwidthLimit": null,
      "labels": ["trusted"]
    },
    "198.51.100.25": {
      "allow": false
    }
  }
}
Notes:
- First matching IP rule wins
- If no rule matches,
defaultsis used expireAt(optional, ms timestamp) can be used for temporary rules- IPv4, IPv6, CIDR, and
*are supported
Bandwidth Limiting (Gateway Ingress Shaping)
When bandwidthLimit is set in the matched ingress rule:
- traffic above the sustained limit is delayed (shaped)
- if queued burst exceeds the configured burst budget, the channel is dropped
Fields:
mbps: sustained bandwidthburstMbps(optional): burst capacity (defaults tombps)
Fingerprint Resolver (Provider Side)
The provider can run a local HTTP resolver so backends (e.g. Nginx helpers/scripts) can map provider-side socket tuples back to original client metadata.
Defaults:
- host:
127.0.0.1 - port:
8080 - basic auth: disabled
Useful options:
--fingerprintResolverHost--fingerprintResolverPort--fingerprintResolverBasicAuth user:pass
Endpoints:
GET /healthGET /resolve
Temporary “Unlimited” Override (Gateway)
The gateway can optionally expose a local /unlimited endpoint for trusted machines.
Purpose:
- let trusted machines refresh a temporary per-IP ingress override
- remove bandwidth limits for that caller IP for a short window
[!NOTE] caller IP must match token IP
Enable it with:
hypergate --router <router> --gateway --listen 0.0.0.0 \
  --unlimitedSecret "shared-secret" \
  --unlimitedHost 127.0.0.1 \
  --unlimitedPort 8091
The endpoint is intended for automation (e.g. curl loop on trusted hosts).
Call it with curl:
SECRET='shared-secret'
IP='203.0.113.10'

TIMESTAMP="$(date +%s%3N)"
PAYLOAD="{\"timestamp\":${TIMESTAMP},\"ip\":\"${IP}\"}"

TOKEN="$(printf '%s' "$PAYLOAD" | openssl enc -aes-256-cbc -pbkdf2 -iter 10000 -md sha256 -salt -pass pass:$SECRET | openssl base64 -A | tr '+/' '-_' | tr -d '=')"

curl "http://127.0.0.1:8091/unlimited?payload=${TOKEN}"
Token format is a single base64url string containing the OpenSSL enc output (Salted__ header + salt + ciphertext), encrypted with AES-256-CBC + PBKDF2.
Since the payload is encrypted and has replay protection it can be safely sent via http without additional transport security, as long as the secret is not leaked.
Common CLI Options
Provider:
--provider <services.json>--ingressPolicy <json|path|url>(repeatable, merged)--fingerprintResolverHost <ip>--fingerprintResolverPort <port>--fingerprintResolverBasicAuth <user:pass>
Gateway:
--gateway--listen <ip>--unlimitedSecret <secret>--unlimitedHost <ip>--unlimitedPort <port>
Use hypergate --help for the full list.
[!NOTE] Environment variables also exist for these options (
HYPERGATE_*).
Security Notes
- Treat the router secret like a credential.
- If loading ingress policy from URLs, use trusted sources.
License / Warranty
Experimental software, no warranty.
See LICENSE.